If you are developing with WSPBuilder and have started a project with a workflow do yourself a big favor.
Edit your .csproj file and add an import statement for the workflow foundation. Find the following line in a C# project or the vb equivalent "<Import Project=”$(MSBuildBinPath)\Microsoft.CSharp.targets” />" and add this line after it.
<Import Project=”$(MSBuildExtensionsPath)\Microsoft\Windows Workflow Foundation\v3.0\Workflow.Targets” />
At a minimum it will allow you to use declarative conditions. If you don't add this you'll have to use code conditions in your while loops.
Monday, December 28, 2009
Wednesday, December 16, 2009
Gears Turning - Javascript setTimeout
A common challenge is to present the user with a progress bar or animated gif during a long running script. Sounds really easy, before the long running script set the style of an animated gif from none to inline and start the script. We all know what happens next, a frozen gif. The best way to get around this is to use the setTimeout function to allow the browser to return and let the gif move. The example below uses setTimeout to set up a recursive call to give us the needed user feedback.
To try out the sample add a CEWP to a webpart page and paste the included script. If you don't have a SharePoint site, add the script to a html page and get an animated gif here.
To try out the sample add a CEWP to a webpart page and paste the included script. If you don't have a SharePoint site, add the script to a html page and get an animated gif here.
<div id="gears" style="display:none">
<img src="/_layouts/IMAGES/GEARS_AN.GIF"></img></br></br>
</div>
<div id="done" style="display:none">
<span>Long Running Done</span></br></br>
</div>
<input type="button" value="Start Long Process" onclick="longRunning()"></input>
<script type="text/javascript">
var i, length, data
length = 1500;
data = [];
//random numbers to sort
for (i = 0; i < length; i++) {
data[i] = Math.floor(Math.random() * length);
}
function sort () {
i = 0;
function inner() {
var j, value;
//do the sorting
for (j = length; j > i; j--) {
if (data[j] < data[j - 1]) {
value = data[j];
data[j] = data[j - 1];
data[j - 1] = value;
}
}
i++;
//let the browser "breath" so the gears will turn
if (i < length) {
//to see the browser freeze swap these
setTimeout(function(){inner();},0);
//inner();
}
else{
//done hide the gears
document.getElementById("gears").style.display = "none";
document.getElementById("done").style.display = "block";
}
};
inner();
}
function longRunning(){
//show gears
document.getElementById("gears").style.display = "block";
//call the long running process
setTimeout(function(){sort();},2000);
}
</script>
Thursday, November 26, 2009
An Easy SharePoint Lightbox Page
This is a followup to a previous post that can be found here SharePoint Lightbox. If you haven't looked it over, you should take a quick look. Anyway, a modal window is nice, but what we really need is a custom form to display in the lightbox. We don't want our users navigating around in the modal window and the oob forms weren't designed to be shown in modal windows. Here is what we're going to do, create a new page in SharePoint designer to insert a new item into a list. The new page will not include site navigation. The open buttons will preform as usual with validation and insert, but will close the lightbox when the new item has been saved. The cancel buttons will close the lightbox. Here is the final product.

Open the site in SharePoint Desinger
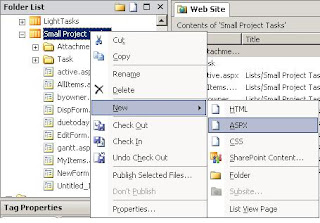 Expand the Lists folder and right click the list your interested in. Select New ASPX.
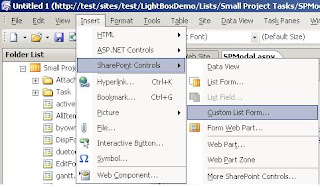 The page will open. Select Insert on the command line -> SharePoint Controls -> Custom List Form
 A popup form will display the lists in the web, select the list you want, the content type, the type of form and check Show standard toolbar. Click ok.
Add the following script to the header section of the new page.
Finally Add a Title for the new page

Select the first area of the page, the outlined box or the highlighted <td> tag. Replace that tag with this one.
<td width="99%" nowrap=""><SharePoint:ListProperty Property="Title" runat="server"/></td>
That's it your done! This page is ready to be used in a lightbox.

Open the site in SharePoint Desinger
 Expand the Lists folder and right click the list your interested in. Select New ASPX.

Rename the page if you would like, untitled.aspx isn't appealing to me.
<SharePoint:CssLink runat="server"/>
<SharePoint:Theme runat="server"/>
<script type="text/javascript" src="http://ajax.googleapis.com/ajax/libs/jquery/1.3.2/jquery.min.js"></script>
<script type="text/javascript">
$(document).ready(function(){
$("input[id*='savebutton']").removeAttr('onclick');
$("input[id*='savebutton']").click(function(){
if (!PreSaveItem())
{ return false; }
var ctlName = $(this).attr('name');
setTimeout(function(){
WebForm_DoPostBackWithOptions(new WebForm_PostBackOptions(ctlName, "", true, "", "", false, true));
setTimeout(function(){parent.$.modal.close();},1);
},1);
});
$("input[id*='gobackbutton']").click(function(){
parent.$.modal.close();
});
});
</script>
Finally Add a Title for the new page

Select the first area of the page, the outlined box or the highlighted <td> tag. Replace that tag with this one.
<td width="99%" nowrap=""><SharePoint:ListProperty Property="Title" runat="server"/></td>
That's it your done! This page is ready to be used in a lightbox.
Friday, November 20, 2009
Phone Number Custom Field Control
SharePoint custom fields are a useful technique for ensuring a consistent UI and data validation rules. Unfortunately, they are a little complex and unwieldy. The pain can be eased a bit by using the defacto visual studio templates for SharePoint, WSPBuilder. If you don't have it installed, you should really think about going over to codeplex and downloading a copy. In this post I'll explain one implementation of a phone number field. In a nutshell, custom fields are user controls with special supporting classes.


Here are screen shots of how
the field will be displayed
 This is the add column screen with
the new field type selected.
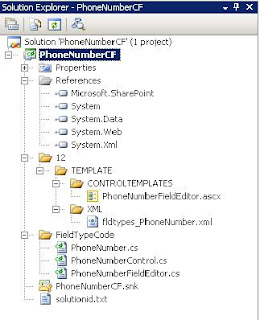 To help you visualize what is going
on, here is a screen shot of the solution
explorer for the project.
The following code snippet is the entirety of the user control we need in this case.
This is the class referenced by the user control. Again very basic.
This is the PhoneNumber class instantiated by the PhoneNumberFieldEditor. There is a good deal more going on here. Luckily most of this is coming straight from the visual studio project and has to do with setting and getting custom properties. The methods to pay attention to here are FieldRenderingControl, GetFieldValue and GetValidatedString. They create the field, return the fields value and validate the data entered into the control.
This class is very much like web part class. The CreateChildControls method is overridden to add the controls used during adding and editing the field in list items. Here it's three textboxes. The UpdateFieldValueInItem method is responsible for invoking the custom validation and displaying the validation error message if one is generated.
This is the xml file that is for the most part generated by the visual studio project. There are two areas of interest. The TypeShortDescription attribute is what is displayed on the add columns screen. The ParentType attribute is important and needs to be set properly for the field to be displayed properly. The last and most important area is the DisplayPattern. This defines the template that will be used to display your custom field.


Here are screen shots of how
the field will be displayed

the new field type selected.

on, here is a screen shot of the solution
explorer for the project.
The following code snippet is the entirety of the user control we need in this case.
<%@ Control Language="C#" Inherits="PhoneNumberCF.PhoneNumberFieldEditor, PhoneNumberCF, Version=1.0.0.0, Culture=neutral, PublicKeyToken=ec0a1394243e2c9c" compilationMode="Always" %>
This is the class referenced by the user control. Again very basic.
using System;
using System.Collections.Generic;
using System.Text;
using System.Web.UI;
using System.Web.UI.WebControls;
using Microsoft.SharePoint;
using Microsoft.SharePoint.WebControls;
namespace PhoneNumberCF
{
public class PhoneNumberFieldEditor : UserControl, IFieldEditor
{
// Fields
private PhoneNumber fldPhoneNumber;
public void InitializeWithField(SPField field)
{
this.fldPhoneNumber = field as PhoneNumber;
if (this.Page.IsPostBack)
{ return; }
}
public void OnSaveChange(SPField field, bool bNewField)
{
PhoneNumber lookup = (PhoneNumber)field;
lookup.IsNew = bNewField;
}
// Properties
public bool DisplayAsNewSection
{
get
{ return false; }
}
}
}
This is the PhoneNumber class instantiated by the PhoneNumberFieldEditor. There is a good deal more going on here. Luckily most of this is coming straight from the visual studio project and has to do with setting and getting custom properties. The methods to pay attention to here are FieldRenderingControl, GetFieldValue and GetValidatedString. They create the field, return the fields value and validate the data entered into the control.
using System;
using System.Collections.Generic;
using System.Text;
using Microsoft.SharePoint;
using Microsoft.SharePoint.WebControls;
using System.Web.UI;
using System.Web.UI.WebControls;
using System.Text.RegularExpressions;
namespace PhoneNumberCF
{
public class PhoneNumber : SPFieldMultiColumn
{
private static string[] CustomPropertyNames = new string[] { "CustProp" };
public PhoneNumber(SPFieldCollection fields, string fieldName)
: base(fields, fieldName)
{ InitProperties(); }
public PhoneNumber(SPFieldCollection fields, string typeName, string displayName)
: base(fields, typeName, displayName)
{ InitProperties(); }
#region Property storage and bug workarounds - do not edit
/// <summary>
/// Indicates that the field is being created rather than edited. This is necessary to
/// work around some bugs in field creation.
/// </summary>
public bool IsNew
{
get { return _IsNew; }
set { _IsNew = value; }
}
private bool _IsNew = false;
/// <summary>
/// Backing fields for custom properties. Using a dictionary to make it easier to abstract
/// details of working around SharePoint bugs.
/// </summary>
private Dictionary<string, string> CustomProperties = new Dictionary<string, string>();
/// <summary>
/// Static store to transfer custom properties between instances. This is needed to allow
/// correct saving of custom properties when a field is created - the custom property
/// implementation is not used by any out of box SharePoint features so is really buggy.
/// </summary>
private static Dictionary<string, string> CustomPropertiesForNewFields = new Dictionary<string, string>();
/// <summary>
/// Initialise backing fields from base property store
/// </summary>
private void InitProperties()
{
foreach (string propertyName in CustomPropertyNames)
{
CustomProperties[propertyName] = base.GetCustomProperty(propertyName) + "";
}
}
/// <summary>
/// Take properties from either the backing fields or the static store and
/// put them in the base property store
/// </summary>
private void SaveProperties()
{
foreach (string propertyName in CustomPropertyNames)
{
base.SetCustomProperty(propertyName, GetCustomProperty(propertyName));
}
}
/// <summary>
/// Get an identifier for the field being added/edited that will be unique even if
/// another user is editing a property of the same name.
/// </summary>
/// <param name="propertyName"></param>
/// <returns></returns>
private string GetCacheKey(string propertyName)
{
return SPContext.Current.GetHashCode() + "_" + (ParentList == null ? "SITE" : ParentList.ID.ToString()) + "_" + propertyName;
}
/// <summary>
/// Replace the buggy base implementation of SetCustomProperty
/// </summary>
/// <param name="propertyName"></param>
/// <param name="propertyValue"></param>
new public void SetCustomProperty(string propertyName, object propertyValue)
{
if (IsNew)
{
// field is being added - need to put property in cache
CustomPropertiesForNewFields[GetCacheKey(propertyName)] = propertyValue + "";
}
CustomProperties[propertyName] = propertyValue + "";
}
/// <summary>
/// Replace the buggy base implementation of GetCustomProperty
/// </summary>
/// <param name="propertyName"></param>
/// <param name="propertyValue"></param>
new public object GetCustomProperty(string propertyName)
{
if (!IsNew && CustomPropertiesForNewFields.ContainsKey(GetCacheKey(propertyName)))
{
string s = CustomPropertiesForNewFields[GetCacheKey(propertyName)];
CustomPropertiesForNewFields.Remove(GetCacheKey(propertyName));
CustomProperties[propertyName] = s;
return s;
}
else
{
return CustomProperties[propertyName];
}
}
/// <summary>
/// Called when a field is created. Without this, update is not called and custom properties
/// are not saved.
/// </summary>
/// <param name="op"></param>
public override void OnAdded(SPAddFieldOptions op)
{
base.OnAdded(op);
Update();
}
#endregion
public override BaseFieldControl FieldRenderingControl
{
get
{
BaseFieldControl fieldControl = new PhoneNumberControl(this);
fieldControl.FieldName = InternalName;
return fieldControl;
}
}
public override object GetFieldValue(string value)
{
if (String.IsNullOrEmpty(value))
return null;
SPFieldMultiColumnValue phoneNumberValue = new SPFieldMultiColumnValue(value);
return phoneNumberValue;
}
public override void Update()
{
SaveProperties();
base.Update();
}
public override string GetValidatedString(object value)
{
if ((this.Required == true) && (value.ToString() == ""))
{ throw new SPFieldValidationException(this.Title + " must have a value."); }
SPFieldMultiColumnValue phoneNumberValue = value as SPFieldMultiColumnValue;
if (phoneNumberValue == null)
return String.Empty;
if (String.IsNullOrEmpty(phoneNumberValue[0]) || String.IsNullOrEmpty(phoneNumberValue[1])
|| String.IsNullOrEmpty(phoneNumberValue[2]))
throw new SPFieldValidationException(SPResource.GetString(Strings.MissingRequiredField));
Regex threeN = new Regex(@"\d{3}");
Regex fourN = new Regex(@"\d{4}");
if (!threeN.IsMatch(phoneNumberValue[0]))
{ throw new SPFieldValidationException("Area Code must be numeric"); }
if (!threeN.IsMatch(phoneNumberValue[1]))
{ throw new SPFieldValidationException("Phone number must be numeric"); }
if (!fourN.IsMatch(phoneNumberValue[2]))
{ throw new SPFieldValidationException("Phone number must be numeric"); }
return base.GetValidatedString(value);
}
}
}
This class is very much like web part class. The CreateChildControls method is overridden to add the controls used during adding and editing the field in list items. Here it's three textboxes. The UpdateFieldValueInItem method is responsible for invoking the custom validation and displaying the validation error message if one is generated.
using System;
using System.Collections.Generic;
using System.Text;
using Microsoft.SharePoint;
using Microsoft.SharePoint.WebControls;
using System.Web.UI;
using System.Web.UI.HtmlControls;
using System.Web.UI.WebControls;
using System.Text.RegularExpressions;
namespace PhoneNumberCF
{
public class PhoneNumberControl : BaseFieldControl
{
private PhoneNumber field;
private TextBox p1;
private TextBox p2;
private TextBox p3;
public PhoneNumberControl(PhoneNumber number)
{
this.field = number;
p1 = new TextBox();
p2 = new TextBox();
p3 = new TextBox();
}
public override object Value
{
get
{
EnsureChildControls();
SPFieldMultiColumnValue phoneNumberValue = new SPFieldMultiColumnValue(3);
phoneNumberValue[0] = p1.Text.Trim();
phoneNumberValue[1] = p2.Text.Trim();
phoneNumberValue[2] = p3.Text.Trim();
return phoneNumberValue;
}
set
{
EnsureChildControls();
SPFieldMultiColumnValue phoneNumberValue = value as SPFieldMultiColumnValue;
p1.Text = phoneNumberValue[0];
p2.Text = phoneNumberValue[1];
p3.Text = phoneNumberValue[2];
}
}
protected override void CreateChildControls()
{
if (this.Field != null && this.ControlMode != SPControlMode.Display)
{
base.CreateChildControls();
p1 = new TextBox();
p2 = new TextBox();
p3 = new TextBox();
p1.MaxLength = 3;
p1.Width = new Unit(30);
p2.MaxLength = 3;
p2.Width = new Unit(30);
p3.MaxLength = 4;
p3.Width = new Unit(40);
this.Controls.Add(p1);
this.Controls.Add(new LiteralControl("-"));
this.Controls.Add(p2);
this.Controls.Add(new LiteralControl("-"));
this.Controls.Add(p3);
this.Controls.Add(new LiteralControl("</br>"));
}
}
public override void UpdateFieldValueInItem()
{
this.EnsureChildControls();
try
{
this.ItemFieldValue = this.Value;
}
catch (Exception ex)
{
this.IsValid = false;
this.ErrorMessage = "* " + ex.Message;
}
}
}
}
This is the xml file that is for the most part generated by the visual studio project. There are two areas of interest. The TypeShortDescription attribute is what is displayed on the add columns screen. The ParentType attribute is important and needs to be set properly for the field to be displayed properly. The last and most important area is the DisplayPattern. This defines the template that will be used to display your custom field.
<?xml version="1.0" encoding="utf-8" ?>
<FieldTypes>
<FieldType>
<Field Name="TypeName">PhoneNumber</Field>
<Field Name="ParentType">MultiColumn</Field>
<Field Name="TypeDisplayName">Phone Number</Field>
<Field Name="TypeShortDescription">Phone Number</Field>
<Field Name="UserCreatable">TRUE</Field>
<Field Name="Sortable">TRUE</Field>
<Field Name="AllowBaseTypeRendering">TRUE</Field>
<Field Name="Filterable">TRUE</Field>
<Field Name="FieldTypeClass">PhoneNumberCF.PhoneNumber, PhoneNumberCF, Version=1.0.0.0, Culture=neutral, PublicKeyToken=ec0a1394243e2c9c</Field>
<Field Name="FieldEditorUserControl">/_controltemplates/PhoneNumberFieldEditor.ascx</Field>
<PropertySchema>
<Fields>
</Fields>
</PropertySchema>
<RenderPattern Name="DisplayPattern">
<Switch>
<Expr>
<Column />
</Expr>
<Case Value="" />
<Default>
<HTML><![CDATA[(]]></HTML>
<Column SubColumnNumber="0" HTMLEncode="TRUE" />
<HTML><![CDATA[) ]]></HTML>
<Column SubColumnNumber="1" HTMLEncode="TRUE" />
<HTML><![CDATA[ - ]]></HTML>
<Column SubColumnNumber="2" HTMLEncode="TRUE" />
</Default>
</Switch>
</RenderPattern>
</FieldType>
</FieldTypes>
Thursday, November 12, 2009
SharePoint Lightbox
I've been using light boxes within SharePoint for a couple of years now. If you've seen SharePoint 2010 Microsoft has decided to use them too. The older light boxes greybox and thickbox work well but aren't as attractive as newer versions and are no longer being supported. So, it was time to find a new script to use. First, I tried colorbox. Worked just fine in FF but not in IE. I then tried jQuery UI Dialog. I really wanted to use it for a couple of reasons. jQuery UI has a number of other effects that are really nice and it looks like the product will be supported for the foreseeable future. I was able to get it to load pages in an iframe but it wasn't ideal. I'm going to revisit this one in the future. Then I found a product called SimpleModal . It is simple and modal and works in iframe so AJAX and postbacks work well.
Add a CEWP (Content Editor) Webpart to the page and add the following script
<style type="text/css">
#simplemodal-container a.modalCloseImg {
//This is the image you uploaded
background:url('javascript/x.png') no-repeat;
width:25px;
height:29px;
display:inline;
z-index:3200;
position:absolute;
top:-15px;
right:-18px;
cursor:pointer;
}
#simplemodal-overlay {background-color:#000;}
#simplemodal-container {background-color:#333; border:8px solid #444; padding:12px;}
</style>
//This is the jQuery library see jQuery Cross Site Lists for an explanation
<script type="text/javascript" src="http://ajax.googleapis.com/ajax/libs/jquery/1.3.2/jquery.min.js"></script>
//This is the Simple Modal script you uploaded into a document library
<script type="text/javascript" src="javascript/jquery.simplemodal-1.3.3.min.js"></script>
Add another CEWP Webpart to the page (under the first one) and add the following script
<script>
function modalMe(){
//You need to enter your own page here
var src = "http://test/sites/test/LightBoxDemo/Lists/LightTasks/NewForm.aspx";
$.modal('<iframe src="' + src + '" height="450" width="830" style="border:0">');
}
</script>
<input type="button" onclick="modalMe();" value="Open Modal Window" ></input>

Upload the script and image to a document library
Create a new Webpart Page
Add a CEWP (Content Editor) Webpart to the page and add the following script
<style type="text/css">
#simplemodal-container a.modalCloseImg {
//This is the image you uploaded
background:url('javascript/x.png') no-repeat;
width:25px;
height:29px;
display:inline;
z-index:3200;
position:absolute;
top:-15px;
right:-18px;
cursor:pointer;
}
#simplemodal-overlay {background-color:#000;}
#simplemodal-container {background-color:#333; border:8px solid #444; padding:12px;}
</style>
//This is the jQuery library see jQuery Cross Site Lists for an explanation
<script type="text/javascript" src="http://ajax.googleapis.com/ajax/libs/jquery/1.3.2/jquery.min.js"></script>
//This is the Simple Modal script you uploaded into a document library
<script type="text/javascript" src="javascript/jquery.simplemodal-1.3.3.min.js"></script>
Add another CEWP Webpart to the page (under the first one) and add the following script
<script>
function modalMe(){
//You need to enter your own page here
var src = "http://test/sites/test/LightBoxDemo/Lists/LightTasks/NewForm.aspx";
$.modal('<iframe src="' + src + '" height="450" width="830" style="border:0">');
}
</script>
<input type="button" onclick="modalMe();" value="Open Modal Window" ></input>
Click the button and you should get something like this. If something goes wrong and you can't close the window just refresh the browser.

Wednesday, November 11, 2009
Test Email Without SMTP
One of the major pieces of functionality within SharePoint sites is email. If your developing on a VM like most of us you may not have SMTP set up and configured properly, so no emails. I love moving into development or QA or forbid production without testing basic functionality. So to test email all you have to do is make the following change to the web.config file.
<configuration>
<system.net>
<mailSettings>
<smtp deliveryMethod="SpecifiedPickupDirectory">
<specifiedPickupDirectory pickupDirectoryLocation="c:\email" />
</smtp>
</mailSettings>
</system.net>
</configuration>
<configuration>
<system.net>
<mailSettings>
<smtp deliveryMethod="SpecifiedPickupDirectory">
<specifiedPickupDirectory pickupDirectoryLocation="c:\email" />
</smtp>
</mailSettings>
</system.net>
</configuration>
Thursday, November 5, 2009
A Colorful SharePoint Calendar
A calendar that has events with color coded is easier to read and more attractive. This calendar is made possible with a jQuery, a calculated column, and a customized view. First, lets look at the results. The month, week and day views are all modified and available for use.


Step 1 - Create A Color Column
 Create a new column called color, make it a choice field and add a number of colors for your users to select.
 Enter the following in the formula field
="<span style='background-color:"&color&";padding:4px;text-align:center;width:100%;'>"&Title&"</span>"
Step 3 - Create View that displays the calculated field
Step 4 - Reference the jQuery Library
Add a CEWP to the page and add the following line
<script type="text/javascript" src="http://ajax.googleapis.com/ajax/libs/jquery/1.3.2/jquery.min.js"></script>
Step 5 - Add the script
Add a new CEWP to the page and add the following script
<script type="text/javascript">
// Make sure the page has been loaded
$(document).ready(function() {
$(".ms-cal-dayitem, .ms-cal-dayMultiDay, .ms-cal-monthitem, .ms-cal-defaultbgcolor").each(function(){
var bHtml = $(this).html();
bHtml = bHtml.replace(/<(.+?)>/g,'<$1>');
$(this).html(bHtml);
$(this).find('span').each(function(){
var tdstyle = $(this).attr('style');
$(this).removeAttr('style');
$(this).closest('a').attr('style','color:black').removeAttr('class');
$(this).closest('td').attr('style',tdstyle).removeAttr('class').removeAttr("onmouseover").removeAttr("onmouseout");
});
});
});
</script>
Finally - Add the Calendar View


Step 1 - Create A Color Column

Step 2 - Create A Calculated Column

="<span style='background-color:"&color&";padding:4px;text-align:center;width:100%;'>"&Title&"</span>"
Step 3 - Create View that displays the calculated field

Step 4 - Reference the jQuery Library
Add a CEWP to the page and add the following line
<script type="text/javascript" src="http://ajax.googleapis.com/ajax/libs/jquery/1.3.2/jquery.min.js"></script>
Step 5 - Add the script
Add a new CEWP to the page and add the following script
<script type="text/javascript">
// Make sure the page has been loaded
$(document).ready(function() {
$(".ms-cal-dayitem, .ms-cal-dayMultiDay, .ms-cal-monthitem, .ms-cal-defaultbgcolor").each(function(){
var bHtml = $(this).html();
bHtml = bHtml.replace(/<(.+?)>/g,'<$1>');
$(this).html(bHtml);
$(this).find('span').each(function(){
var tdstyle = $(this).attr('style');
$(this).removeAttr('style');
$(this).closest('a').attr('style','color:black').removeAttr('class');
$(this).closest('td').attr('style',tdstyle).removeAttr('class').removeAttr("onmouseover").removeAttr("onmouseout");
});
});
});
</script>
Finally - Add the Calendar View
Cannot connect to the configuration database
The "Cannot connect to the configuration database" is a common error you'll run into while developing on a VM. All you need to do is restart the SQL Server (MSSQLSERVER) service.
Monday, November 2, 2009
Custom Timer Job to Backup the Web.Config file
The solution that follows will backup the web.config file on each web front end for a given webapplication. Not only is the functionality useful, it demonstrates the power of a custom timer job. With a custom timer, SharePoint will execute the code on each server in the farm. Currently the code is being executed from a FeatureActivated event but could be executed from a webpart, custom action, workflow or ..... It will save the administrator some time.
using System;
using System.Collections.Generic;
using System.Diagnostics;
using System.Text;
using Microsoft.SharePoint;
using Microsoft.SharePoint.Administration;
using System.Xml;
using Microsoft.SharePoint.Utilities;
using System.IO;
namespace BackUpWebConfig
{
class WebConfig : SPFeatureReceiver
{
public override void FeatureActivated(SPFeatureReceiverProperties properties)
{
SPWebApplication oWebApp = (SPWebApplication)properties.Feature.Parent;
//Create a new instance of the timer job
BackUpWebConfig BackupWeb = new BackUpWebConfig(oWebApp);
//Configure and submit the new job
BackupWeb.SubmitJob();
}
public override void FeatureDeactivating(SPFeatureReceiverProperties properties)
{
//throw new Exception("The method or operation is not implemented.");
}
public override void FeatureInstalled(SPFeatureReceiverProperties properties)
{
//throw new Exception("The method or operation is not implemented.");
}
public override void FeatureUninstalling(SPFeatureReceiverProperties properties)
{
//throw new Exception("The method or operation is not implemented.");
}
}
//Our custom timer job class
public class BackUpWebConfig : SPJobDefinition
{
[Persisted]
private string _uniqueID;
public BackUpWebConfig() { }
public BackUpWebConfig(SPWebApplication WebApp)
: this(WebApp, Guid.NewGuid().ToString())
{}
private BackUpWebConfig(SPWebApplication WebApp, string UniqueID)
: base("BWC_" + UniqueID, WebApp, null, SPJobLockType.None)
{
_uniqueID = UniqueID;
}
// Submits the job and schedules it to run on every server in the Farm.
public void SubmitJob()
{
//set the schedule property to a one time job, there are a number of other
//types if you want the job to run on a normal schedule
Schedule = new SPOneTimeSchedule(DateTime.Now);
Title = "Backup Web.config (" + _uniqueID + ")";
Update();
}
//called by the timer service on each server
public override void Execute(Guid targetInstanceId)
{
try
{
SPWebApplication o = this.WebApplication;
foreach (SPUrlZone z in o.IisSettings.Keys)
UpdateIisSite(o.IisSettings[z]);
}
catch (Exception ex)
{
Debug.WriteLine("Failed to backup web.config");
Debug.WriteLine(ex);
throw;
}
}
//Copy the web.config to a backup
private void UpdateIisSite(SPIisSettings oSettings)
{
string webConfigLoc = oSettings.Path.ToString();
string fileExt = DateTime.Now.Year.ToString() + DateTime.Now.Month.ToString() +
DateTime.Now.Day.ToString() + DateTime.Now.Hour.ToString() +
DateTime.Now.Minute.ToString() + DateTime.Now.Second.ToString();
//Back up current config
if(File.Exists(webConfigLoc + @"\web.config"))
{
File.Copy(webConfigLoc + @"\web.config", webConfigLoc +
@"\web_" + fileExt + ".config", true);
}
}
}
}
Wednesday, October 28, 2009
SharePoint 101 - Dispose of SPWeb Objects
One of the most important things you can do to ensure a stable and responsive SharePoint environment is to dispose of SPWeb objects. SPWeb object are fat. The "automatic" garbage collection in .net 2.0 just doesn't do the job. So, use a using statement or explicitly call dispose. If you are passing SPWeb objects around you need to dispose of them in the method were they are used. The only time you'll run into issues disposing of an SPWeb object is when it's the current web like SPWeb myWeb = SPContext.Current.Web. Go ahead and try disposing of it anyway, it's better to fix the error and make sure you're disposing properly. A tool is available to help you check your code, SPDisposeCheck.
SPWeb myWeb = site.OpenWeb();
try{}
catch{}
finally
{
if(myWeb != null)
myWeb.Dispose();
}
using(SPWeb myWeb = site.OpenWeb())
{}
SPWeb myWeb = site.OpenWeb();
try{}
catch{}
finally
{
if(myWeb != null)
myWeb.Dispose();
}
using(SPWeb myWeb = site.OpenWeb())
{}
Saturday, October 24, 2009
Allow Anonymous Users to run SharePoint Workflows
The code that follows will allow you to start a workflow from an event receiver. There are a couple of reasons that you may want to do this. First, you have more control over your workflow. You can check and make sure that it's started successfully. Second, you can allow users or processes to execute workflows that couldn't otherwise. Next is how you can find your workflow's guid.

OOB Workflow - get the TemplateID from the url
the guid here is 19149E7D-1970-4432-B174-D88C7BF2B4008

using System;
using System.Collections.Generic;
using System.Text;
using Microsoft.SharePoint;
using System.Net;
using System.Diagnostics;
using Microsoft.SharePoint.Workflow;
namespace StartWorkflow
{
class StartWorkflowOnItemAdded : SPItemEventReceiver
{
// use the itemadded event to start a workflow
public override void ItemAdded(SPItemEventProperties properties)
{
try
{
// make sure no other events can be fired
DisableEventFiring();
// execute StartWorkflow as application pool
SPSecurity.RunWithElevatedPrivileges(delegate(){
StartWorkflow(properties);
});
}
catch (Exception ex)
{}
finally
{
// allow other events to fire
EnableEventFiring();
}
}
private void StartWorkflow(SPItemEventProperties properties)
{
using (SPSite site = new SPSite(properties.WebUrl))
{
using (SPWeb web = site.OpenWeb())
{
try
{
SPList list = web.Lists[properties.ListId];
//enter your workflow Guid
Guid wGuid = new Guid("{}");
//get the association data
SPWorkflowAssociation wTemplate =
list.WorkflowAssociations.GetAssociationByBaseID(wGuid);
//start your workflow
site.WorkflowManager.StartWorkflow(properties.ListItem,
wTemplate, wTemplate.AssociationData);
}
catch (Exception ex)
{}
}
}
}
}
}
SharePoint Designer Workflow - 650F1ED3-2FEE-499D-A9A2-40BE326951C1

OOB Workflow - get the TemplateID from the url
the guid here is 19149E7D-1970-4432-B174-D88C7BF2B4008

using System;
using System.Collections.Generic;
using System.Text;
using Microsoft.SharePoint;
using System.Net;
using System.Diagnostics;
using Microsoft.SharePoint.Workflow;
namespace StartWorkflow
{
class StartWorkflowOnItemAdded : SPItemEventReceiver
{
// use the itemadded event to start a workflow
public override void ItemAdded(SPItemEventProperties properties)
{
try
{
// make sure no other events can be fired
DisableEventFiring();
// execute StartWorkflow as application pool
SPSecurity.RunWithElevatedPrivileges(delegate(){
StartWorkflow(properties);
});
}
catch (Exception ex)
{}
finally
{
// allow other events to fire
EnableEventFiring();
}
}
private void StartWorkflow(SPItemEventProperties properties)
{
using (SPSite site = new SPSite(properties.WebUrl))
{
using (SPWeb web = site.OpenWeb())
{
try
{
SPList list = web.Lists[properties.ListId];
//enter your workflow Guid
Guid wGuid = new Guid("{}");
//get the association data
SPWorkflowAssociation wTemplate =
list.WorkflowAssociations.GetAssociationByBaseID(wGuid);
//start your workflow
site.WorkflowManager.StartWorkflow(properties.ListItem,
wTemplate, wTemplate.AssociationData);
}
catch (Exception ex)
{}
}
}
}
}
}
Thursday, October 22, 2009
SharePoint Progamming 101 - Impersonation
Many times you want to make sure that your code runs no mater what permissions the current user has. There are two easy ways that you can accomplish this in SharePoint. Both of the techniques do the same thing, execute code with the permissions of the application pool the site is running under. You must create a new spweb object from a url after impersonating the application pool.
WindowsImpersonationContext ctx = null;
ctx = WindowsIdentity.Impersonate(System.IntPtr.Zero);
SPSite site = new SPSite("http://mysteurl");
SPWeb web = site.OpenWeb();
try
{
//All of this code will run with elevated privileges
}
catch (Exception ex)
{}
finally
{
web.Dispose();
//make sure you revert to normal
ctx.Undo();
}
SPSecurity.RunWithElevatedPrivileges(delegate()
{
using (SPSite site = new SPSite("http://mysteurl"))
{
using (SPWeb web = site.OpenWeb())
{
//All of this code will run with elevated privileges
}
}
});
Method 1
//Impersonate the poolWindowsImpersonationContext ctx = null;
ctx = WindowsIdentity.Impersonate(System.IntPtr.Zero);
SPSite site = new SPSite("http://mysteurl");
SPWeb web = site.OpenWeb();
try
{
//All of this code will run with elevated privileges
}
catch (Exception ex)
{}
finally
{
web.Dispose();
//make sure you revert to normal
ctx.Undo();
}
Method 2
//Impersonate the poolSPSecurity.RunWithElevatedPrivileges(delegate()
{
using (SPSite site = new SPSite("http://mysteurl"))
{
using (SPWeb web = site.OpenWeb())
{
//All of this code will run with elevated privileges
}
}
});
Sunday, October 18, 2009
SharePoint Cross Site List Views with jQuery
Displaying or sharing lists across webs or site collections is not supported out of the box by SharePoint. The best way to overcome this limitation is by loading the list dynamically. Ok, sounds great but how am I supposed to do that? No worries, it's really pretty easy. I will use jQuery's load function to do the bulk of the work. The code here has been adapted from Christophe's solution . There are a number of changes, the most important being enabling sorting by column.
<script type="text/javascript" src="http://ajax.googleapis.com/ajax/libs/jquery/1.3.2/jquery.min.js"></script>
Add the Script to the page
Add a new CEWP, yes you have to, to your page and add the following script.
<DIV id="ListPlaceholder"><span><b>...Loading...</b></span></DIV>
<script type="text/javascript">
// Make sure the page has been loaded
$(document).ready(function() {
// Paste the URL of the source list below:
var SelectedView = "http://test/sites/test/Lists/Tasks/AllItems.aspx";
// Paste the URL of Add new items page
var AddNewItems = "http://test/sites/test/Lists/Tasks/NewForm.aspx" + "?Source="+location.href;
// Title
var mTitle = "My List Name";
// Title tool tip
var MouseOverHeader = "My List Name Description";
var innerHTML = "<a href=" + AddNewItems + " tabindex='0' accesskey='W'><nobr><span>" + mTitle + "</span><span id='WebPartCaptionWPQ6'/></nobr></a>";
// Load the list
$("#ListPlaceholder").load(SelectedView+" [id^='WebPartWPQ'] .ms-listviewtable", function(){processView();setColumnClicks();});
// Format the returned list view
function processView(){
//set the header of the content place holder
var hdrNode = $("#ListPlaceholder").closest('tr').prev().find('h3');
hdrNode.html(innerHTML);
hdrNode.parent(0).attr('title', MouseOverHeader);
//Remove the dropdown menus for items
$("#ListPlaceholder *").removeAttr("id").removeAttr("onclick").removeAttr("onfocus").removeAttr("onmouseover");
//Format the Items
$("#ListPlaceholder a").each(function() {
if ($(this).attr("href").indexOf("javascript") == -1){
if ($(this).attr("href").indexOf("mailto") == -1){
if ($(this).attr("href").indexOf("?") > 0){
$(this).attr("href",$(this).attr("href")+"\&Source="+location.href);}
else {$(this).attr("href", $(this).attr("href")+"?Source="+location.href);}
}
}
});// close each
}// close processView
//Make the titles sortable
function setColumnClicks(){
$("#ListPlaceholder a[sortingfields]").click(function(){
var srtFields = $(this).attr('sortingfields');
$("#ListPlaceholder").load(SelectedView +"?" + srtFields + " [id^='WebPartWPQ'] .ms-listviewtable", function(){processView();setColumnClicks();});
});
}
});//Close document.ready
</script>
$("#ListPlaceholder").load(SelectedView+" [id^='WebPartWPQ'] .ms-listviewtable", function(){processView();setColumnClicks();});
This line means the following. Find the element on this page with an id of ListPlaceholder and load the content from SelectedView. Only load the content where the element id starts with WebPartWPQ and has the class ms-listviewtable. After loading the content run functions processView() and setColumnClicks().
Another question you may have is what is this Source used all over the place for ? SharePoint uses Source= in the url to return to the previous page.
Load the jQuery library
I'm adding a content editor web part to include the jQuery library. You should probably add the library to your master page. Once you start using it you'll want to add it all over the place. Add a CEWP to your page and add the following script tag. This will load jQuery from Google.<script type="text/javascript" src="http://ajax.googleapis.com/ajax/libs/jquery/1.3.2/jquery.min.js"></script>
Add the Script to the page
Add a new CEWP, yes you have to, to your page and add the following script.
<DIV id="ListPlaceholder"><span><b>...Loading...</b></span></DIV>
<script type="text/javascript">
// Make sure the page has been loaded
$(document).ready(function() {
// Paste the URL of the source list below:
var SelectedView = "http://test/sites/test/Lists/Tasks/AllItems.aspx";
// Paste the URL of Add new items page
var AddNewItems = "http://test/sites/test/Lists/Tasks/NewForm.aspx" + "?Source="+location.href;
// Title
var mTitle = "My List Name";
// Title tool tip
var MouseOverHeader = "My List Name Description";
var innerHTML = "<a href=" + AddNewItems + " tabindex='0' accesskey='W'><nobr><span>" + mTitle + "</span><span id='WebPartCaptionWPQ6'/></nobr></a>";
// Load the list
$("#ListPlaceholder").load(SelectedView+" [id^='WebPartWPQ'] .ms-listviewtable", function(){processView();setColumnClicks();});
// Format the returned list view
function processView(){
//set the header of the content place holder
var hdrNode = $("#ListPlaceholder").closest('tr').prev().find('h3');
hdrNode.html(innerHTML);
hdrNode.parent(0).attr('title', MouseOverHeader);
//Remove the dropdown menus for items
$("#ListPlaceholder *").removeAttr("id").removeAttr("onclick").removeAttr("onfocus").removeAttr("onmouseover");
//Format the Items
$("#ListPlaceholder a").each(function() {
if ($(this).attr("href").indexOf("javascript") == -1){
if ($(this).attr("href").indexOf("mailto") == -1){
if ($(this).attr("href").indexOf("?") > 0){
$(this).attr("href",$(this).attr("href")+"\&Source="+location.href);}
else {$(this).attr("href", $(this).attr("href")+"?Source="+location.href);}
}
}
});// close each
}// close processView
//Make the titles sortable
function setColumnClicks(){
$("#ListPlaceholder a[sortingfields]").click(function(){
var srtFields = $(this).attr('sortingfields');
$("#ListPlaceholder").load(SelectedView +"?" + srtFields + " [id^='WebPartWPQ'] .ms-listviewtable", function(){processView();setColumnClicks();});
});
}
});//Close document.ready
</script>
Explaining the script
This line in the script really does all of the work$("#ListPlaceholder").load(SelectedView+" [id^='WebPartWPQ'] .ms-listviewtable", function(){processView();setColumnClicks();});
This line means the following. Find the element on this page with an id of ListPlaceholder and load the content from SelectedView. Only load the content where the element id starts with WebPartWPQ and has the class ms-listviewtable. After loading the content run functions processView() and setColumnClicks().
Another question you may have is what is this Source used all over the place for ? SharePoint uses Source= in the url to return to the previous page.
Sunday, October 11, 2009
Customizing a SharePoint Banner
Modifying the header or banner portion of a SharePoint page is not as easy as you would hope. In this post I’ll walk you through one possible approach to adding a custom look while maintaining the functionality and positioning of out of the box components. I’m going to be using SharePoint designer to modify the master page to customize the banner. This is what I’m starting with.

Open the site you’re working on with SharePoint designer File > Edit with Microsoft Office SharePoint Designer. COPY the default.master page found in this directory _catalogs/masterpage/. Open the copied master page, find the tag below, it’s the starting point for the header portion of the page.
<TABLE class="ms-main" CELLPADDING=0 CELLSPACING=0 BORDER=0 WIDTH="100%" HEIGHT="100%">
Add this line directly underneath the table tag. You can also add an image as the background here as long as it grows and shrinks gracefully.
<tr><td><div style="background-color:fuchsia"><table width="100%">
Find <asp:ContentPlaceHolder ID="WSSDesignConsole" runat="server"> close the tags you’ve just added by adding this line above the content placeholder </table></div></td></tr>.


Find and remove class="ms-bannerContainer".

Ok, we’ve changed the background color. Let’s change the title of the site. Find the content place holder tag below and remove it.
<td class="ms-sitetitle" width=100%>
<asp:ContentPlaceHolder id="PlaceHolderSiteName" runat="server">
<SharePoint:SPLinkButton runat="server" NavigateUrl="~site/" id="onetidProjectPropertyTitle">
<SharePoint:ProjectProperty Property="Title" runat="server" /> </SharePoint:SPLinkButton>
</asp:ContentPlaceHolder>
</td>
Once you have removed the content place holder tag and its contents you, will not be able to change the title via the admin settings in the browser. Add whatever markup here you would like.
<h2 style="color:white">This has been way harder than it should be</h2>
You can use this area to include an image as well, replace the <h2> tag with something like this:
<div style="background-image:url('images/header.gif');background-repeat:no-repeat; height:150px"></div>
To Get rid of the icon to the left find the SharePoint:SiteLogoImage tag and replace LogoImageUrl="/_layouts/images/titlegraphic.gif" with LogoImageUrl="/_layouts/images/blank.gif"

Subscribe to:
Comments (Atom)
